Macro Designs Back to Techniques
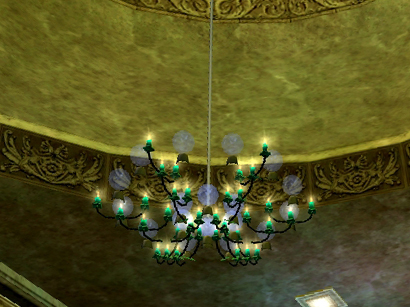
This chandelier was my first macro design. It's part of the decoration of my guild's city hall. At the time I thought the candles would go out in a few weeks and the thought of having to do it all over again is what motivated me to try to macro it.
By the way these macros will probably be too long to be stored as macros after you log out. Use the /note to write them and then just paste them into a macro whenever you need to use them.
Some designers might get upset at me for macroing what should be individual works of art but that is why I'm sharing this information for anyone who wants to use it. The demand for multi-item decor is insane and there are far too few of us to meet it. I think macros can revolutionize swg decorating and make it more accessible to everyone.
Radial Macros
These are the simplest form of decorating macro, and can be great for taking the repetitive work out of making circular designs. They are even simpler if the items you are making the circle out of are round (meaning it doesn't matter if you rotate them, they look the same... the wookiee life day orbs for example.) In the orb part of my chandelier macro I only had to write one sixth of the macro and then repeat it six times.
This
macro looked something like this:
(all items need to be dropped in one spot along with
your chair. The /move forward and /more up numbers here are off the top of
my head btw =P)
/target
chair;
/pause 1;
/rotate left 60;
/pause 1;
/sit;
/pause 1;
/target Wookiee Life Day Orb;
/pause 1;
/move forward 60;
/pause 1;
/move up 300;
/pause 1;
/stand;
If you repeat this macro six times, you will have a circle of orbs with a radius of 60, and floating off the floor by 300. It is important to move each item away from you and into position before you /target another item of the same name. The /target command will always pick the item closest to you. So as long as you are moving things away from your character and staying on top of the item pile you will select a new item each time.
By the way this macro could have been streamlined a little bit by moving one orb forward and one orb backward between each chair rotation -- doing a third of the circle at once instead of a sixth. It can also be streamlined by abbreviating. /target will work as just /tar and you only need the first few letters of the item name too.
Radial macros get more complicated when the items are not round. For example, the Bestine style candles in the chandelier had to be rotated as well as moved. To position the candles I wrote a 3rd of the macro at a time, moving 3 candles forward and 3 candles backward and rotating each one as I moved it into place. Then I would rotate the chair by 60, and basically repeat the same set of commands over again with one difference -- the /rotate angles for the candles changed. (60 more degrees, same as I moved the chair) So the finished macro looked kinda like this, only with a lot more candles. ALSO, I removed the pauses for the sake of making it more readable but there still has to be some sort of pause between every line.
/rotate
chair left 60;
/sit;
/target candle;
/rotate left 60;
/move forward blah;
/target candle;
/rotate left 60;
/move backward blah;
/target chair;
/rotate chair left 60;
/stand;
/sit;
/target candle;
/rotate left 120;
/move forward blah;
/target candle;
/rotate left 120;
/move backward blah;
/target chair;
/rotate chair left 60;
/stand;
/sit;
/target candle;
/rotate left 180;
/move forward blah;
/target candle;
/rotate left 180;
/move backward blah;
With
me so far? =/ btw I need reassurance that some people out there are finding
this massive waste of time somewhat useful. So feel free to pm Moolyssa on
the SWG forums with comments or questions. If I get enough questions I'll
make a FAQ.
Linear
Macros
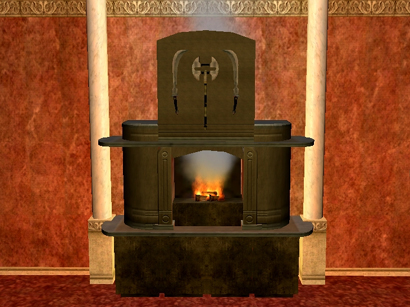
These aren't that complicated in concept, but are a pain in the arse to write. They are easier to write if the design you are building is all right angles and rectangular so I'll use a fireplace as an example. (Plus this one is made with only 20 items, making it fairly simple. Weapon decor not included. ^.^)
Ok I'm going to TRY to explain this without visuals... I might break down and take some screenies of the two stages because I know my explanations can get technical-sounding and make eyes glaze over.
Basically for a linear macro you start with a single pile of items like usual, and move them forward in a straight line -- spacing them apart however far you need them to go in that direction. Next rotate your chair by 90 degrees, and move each of the items forward again by the amounts needed to complete the design. This is somewhat like plotting points on a graph... you need to move them out by the x amount, and then move them by the y amount.
Of course it's more complicated than that since you will probably want to rotate these items and raise them up off the floor too. For the fireplace I did the rotating as I moved the items forward in the first direction, and the /move up as I pushed the items in the second direction. It just made sense to do it that way for this particular design since I had identical items by the same name getting the same rotation and same distance forward in the first step but needing a different height and distance forward in the second step.
For a linear macro the chair doesn't have to be in the middle of the item pile. It just needs to be on the opposite side from the the direction you are moving the items so they keep getting further from you. Actually putting the chair off to the corner of the pile is best so that the items are getting pushed away from you no matter which of the two directions you are moving them in. Just make sure you pad the distance you are moving the items in the final direction enough to prevent /target problems. That is their final resting place so put them out of reach as you target the nearer items that still need to be moved that way. Technically speaking the /move forward #s in the second direction need to be higher than the highest /move forward # in the first direction.
Also naming the items is important. Each item with a different appearance has to have a different name so the macro picks the right one. I had to get a little creative on the parts of the fireplace. The names on it include firebricks, chimney, moulding, mantle, and hearth. Identical items can have the same name as long as you plan ahead to avoid /target problems.
Combination Macros
This way lies madness. I'm currently working on plotting out the design for a large fishtank like the one I made for Zeja. I'm finding that it is requiring a combination of both techniques to build. The main thing I'm doing that is linear is shifting some of the items into a seperate pile and then using the radial method on them from their new central point. I might go into more detail on this later but I think that if you are with me so far you are capable of solving these kinds of problems on your own. Thanks for reading and I wish you well in all your endeavors.